TABLE OF CONTENTS
- Segmenting the warehouse with Zones
- Create New
- Zone Types
- Zone Categories
- Inventory by Zone
- Inventory Summary
- Inventory Transactions
- User Zone Permissions
- Full Order Zones
- Replenishment
- Adding Locations to a Zone
Zones are a way of creating sections within the warehouse. There are several ways that Zones can be used within WarehouseOS.
Segmenting the Warehouse with Zones
Zones can be used to create sections of similar locations. Some examples of how Zones have been used to create sections include:
- Separating inventory for specific sales channels
- Identifying locations that hold different sizes of items (used for Batching)
- Small, Medium, Large, etc. for apparel
- Fragile items that need to be shipped in boxes versus items that can ship in poly mailers
- Identifying dense locations used for picking vs those locations used for overflow or backstock (used for Replenishment)
- Identifying types of products stored in special sections of the warehouse (custom items, damaged, quarantine, on hold, warehouse showroom, etc.)
After an order is allocated, the zones assigned to the pick locations are grouped and shown in the Order and Batch Build pages. This can especially help when batching orders to minimize travel distance when grouping orders that were allocated into the same zones.
Create New
To add a Zone:
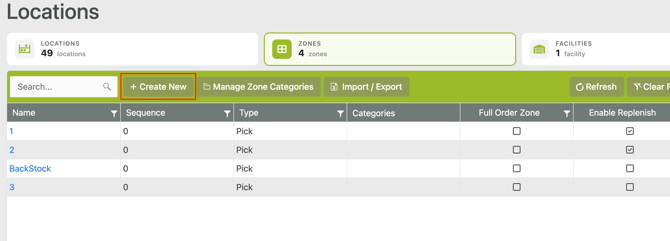
- Go to Maint -> Locations -> Zones
- Click Create New
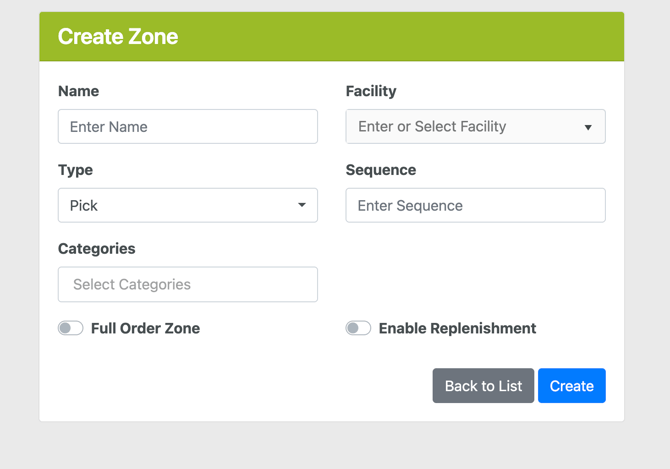
- Add a Name
- Select a Facility
- Set a Type
- Add a Sequence (this is not currently functional and can be skipped)
- Add any applicable Categories
- Turn ON/OFF Full Order Zone
- Turn ON/OFF Enable Replenishment
- Turn this ON for zones that will need to be restocked (typically Pick zones)
- Turn this OFF for zones that will hold overstock and provide inventory to restock other zones (typically Backstock zones)
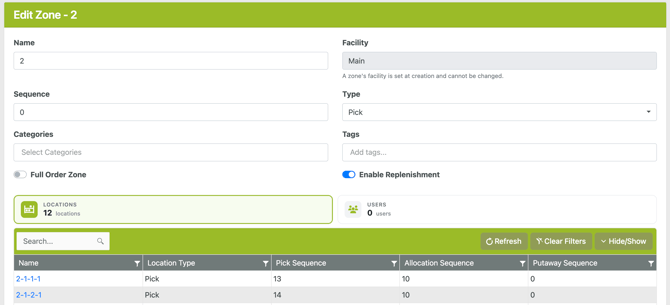
Zone Edit Page
To update or edit a Zone, go to Maint -> Locations -> Zones and click into a specific zone to access the Zone Edit page. Previously set information can be changed or added, including Categories and Tabs. This is with the exception of Facility, once a Facility has been assigned to a zone it cannot be changed.
In addition to originally configured details, there are 2 tabs on this page showing Locations and Users assigned to this zone.
Zone Types
A zone Type is set to indicate what function it will serve in an operation. Types are a preset list with some functionality around specific types.
- Pick - zoned locations with inventory intended to be picked out of to fulfill orders. Pick type zones will show on the Replenishment Report as needing to be restocked when replenishing by zone (refer here for setup)
- Putaway - Putaway zones for Receiving or inbound product. Locations can be organized into sections for a more directed Putaway process. Items are assigned a Putaway Zone and it will show up during Receiving and Putaway on WOS Fulfillment
- Backstock - zoned locations with inventory intended as overstock, waiting to be replenished to pick locations. Backstock type zones will show on the Replenishment Report as options to restock from
- Return - grouped locations for returns or RMAs
- Special - grouped locations for any special or custom inventory purposes, or operational intention that does not fall in the other types
Zone Categories
A zone Category can now be created as a custom object and added to multiple zones. Each zone can also have multiple categories assigned. Categories add a grouping layer to zones to show similarly purposed inventory, and are able to drive behaviors of zones in WOS, like directed allocation by zone category.
Zone Categories can also be used to keep inventory separate and pointing to different channels upstream. Inventory adjustments and reports can be broken out by zone categories, see below for more information.
Create and Manage Categories
Go to Maint -> Locations -> Zones -> Manage Zone Categories.
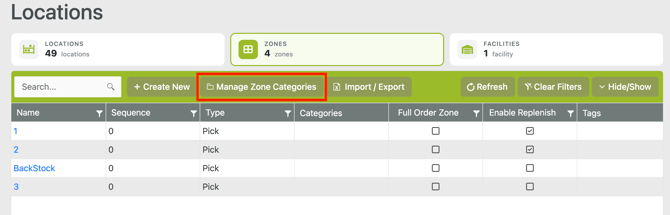
This will open a grid view of existing Categories, allowing for those to be updated or new ones created.
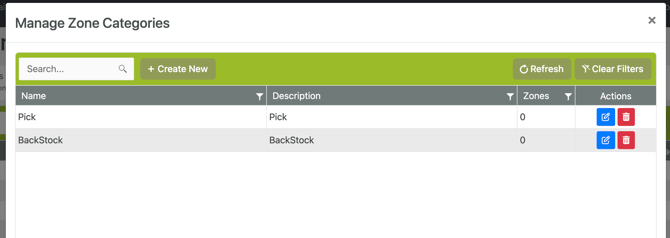
To create a new Category - click on Create New. Add a name and description, and assign to any zones if applicable.
To update or delete existing Categories, use the Edit or Delete actions on the right end of the grid.
To assign or remove a Category to/from a zone, use either the Manage Categories popup, or click into a zone specifically to the Zone Edit page and adjust the Category field. 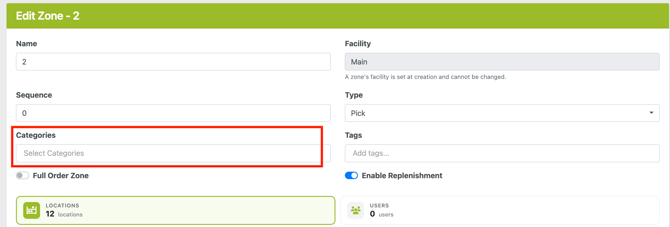
Allocation Process - Zone Categories
Allocation Processes determine how order lines determine an inventory location to assign and pick from. An option when creating an Allocation Process is to factor in Zone Preferences, which use Zone Categories.
A zone Category is used to factor allocation instead of specific zones because it allows the potential of an allocation process to be used across multiple Facilities. If needing to be able to assign specific zones for allocation, categories can be created in a 1:1 ratio of category to zone and used that way. Or if able to be applied more broadly, consider creating categories that describe the types of inventory so they can be applied to multiple zones.
As an example, if there is separated inventory in the warehouse for online D2C orders and orders placed through wholesale channels, zones and categories could be setup like the table below:
| Zone | Type | Category |
| Pick 1 - Ecom | Pick | Pick, Ecom |
| Pick 2 - Ecom | Pick | Pick, Ecom |
| Backstock - Ecom | BackStock |
Backstock, Ecom |
| Pick 1 - WH | Pick | Pick, Wholesale |
| Backstock - WH | BackStock | Backstock, Wholesale |
To ensure that orders coming in through each channel allocate to the proper inventory in the warehouse but also prioritize allocating to the pick zones, two Allocation Processes should be setup like below:
- Ecommerce Allocation - Zone Preferences:
- Category - "Ecom" is REQUIRED
- Category - "Pick" is preferred
- Wholesale Allocation - Zone Preferences:
- Category - "Wholesale" is REQUIRED
- Category - "Pick" is preferred
These preferences will ensure that orders assigned to each allocation process will only be allowed to allocate to inventory in either the Wholesale or Ecommerce zones. It also sets a priority on the pick zones over the backstock zones, while still allowing orders to allocate to the backstock if no other inventory is found.
If wholesale and ecom inventory is not separated like the above example, but still wanting to preference different zones for allocating, multiple allocation routines can still be used. For example if wholesale inventory is preferred to pick from the backstock locations, create an allocation process that sets a "Backstock" category as preferred. Then create a separate allocation process for D2C orders.
Inventory by Zone
Inventory summary, inventory integrations zone category to sales channel, host triggers/messages, etc.
Zones can be used to separate inventory not only for allocation and replenishment, but also to represent inventory for different sales channels. Inventory needing to be separated this way inside of a warehouse can be done with zones and zone categories.
Inventory totals can be viewed or exported in the Inventory Summary page, broken down by zones or zone categories. Inventory transactions to the host can be filtered by zones and categories to route to the correct sales channels or inventory locations in an upstream system.
Inventory Summary by Zone
Inventory Summary by Zone Category
Inventory Transactions by Zone or Category
Inventory Moves from Zone to Zone
User Zone Permissions
Users can be assigned to specific zones. These are used to indicate "permission" to interact with the inventory inside of the assigned zones. This includes Picking, Manage Inventory, Cycle Counting, Replenishment, and restricted Receiving/Putaway in only assigned zones.
Picking
Single Pick with Zones
When picking a Pick Ticket with Single Pick, a user will only be presented with the order lines allocated to the zones they have permission for. This allows multiple users to pick the same ticket at the same time, only picking the zones they are allowed to pick. Pick Tickets can be split up and picked to multiple carts.
Batch Pick with Zones
When picking an order with Batch Pick, a user can only retrieve a batch if they have permissions to all the allocated zones on the batch. It will not show only the lines they have permission to pick, but will instead prompt an error that they are not eligible to pick any part of that batch.
Inventory Apps
- Manage Inventory
- Cycle Count
- Replenishment
- Receiving
- Putaway
Full Order Zones
To improve the speed of picking, locations within a small footprint can be assigned to a Zone marked as a Full Order Zone. When batching, orders that can be fully picked out of a Full Order Zone are shown the zone in the eligibility column in the Unassigned grid. By setting up multiple zones with a small footprint, even repeating product within these zones, this option can be a way of separating and assigning pickers to separate parts of the warehouse.
Full Order Zones are a good way to setup and create multiple pick faces with duplicated items and inventory. If an operation's sku count is low but order volume is high, creating multiple pick faces with the same items can separate pickers and increase the number of batches that can be picked at the same time without bottlenecking. Full Order Zones can be used to direct which batches will allocate to which zone (pickface) and ensure an equal assignment across the two for pickers.
If the option to batch to a Full Order Zone is selected, all of the orders in that batch will be unallocated and the reallocated to the specified zone. All orders in the batch must be eligible for the same Full Order Zone to use this option.
The assignment of a Full Order Zone to an order is based on the inventory in the locations within the Zone, not necessarily available or non-allocated inventory.
Replenishment - UPDATE
Legacy Replenishment Reports - Zones that are marked as Enable Replenish are shown in the Zone Replenishment reports as a Pick Zone that needs to be replenished. All zones not marked as Enable Replenish are then considered candidates for available backstock inventory that can be used to replenish the pick zones.
Replenishment Planner - when using Zone calculated replenishment, the Zone types "Pick" and "BackStock" are used to indicate which locations need to be replenished and where to replenish from. See Replenishment - Zone Requirements to see needed setup.
Adding Locations to a Zone
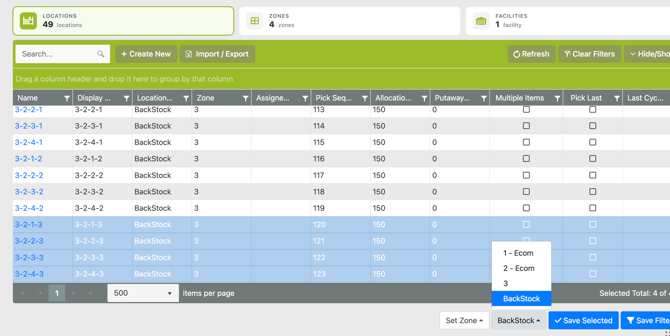
Zone assignments can be managed from the Locations grid. The column Zone will identify the Zone the Location has been assigned to. Actions below the grid can be used to update and manage the Zone assignment.
- Go to Maint -> Locations
- Filter the grid to the desired locations
- In the Actions menu below the grid, select Set Zone
- Select a Zone from the options
- Click Save Filtered
- Alternatively, only select a portion of the filtered Locations and select Save Selected