
Picking is the function on the iPad that directs users to take inventory from locations in the warehouse to fill orders. The Picking process depletes the picked quantities from the respective locations in real time to keep inventory accurate.
The Pick Sequence should be setup beforehand during warehouse setup, please reach out to support@warehouseos.com if help is needed adjusted or setting up the pick path.
Picks are performed against Pick Tickets - the picking task/object in WarehouseOS created in direct relation to an Order Record.
There are 3 different Pick Methods that can be used in picking:
- Single Pick - picks a single ticket at a time, cart optional
- Compartment Pick - picks multiple tickets in a Batch to a cart with Compartments to organize tickets, cart required
- Bulk Pick - picks multiple tickets in a Batch, cart optional
- PackOne batches are considered a Bulk pick method
In the Picking app there are 2 Modes of picking: Single and Batch. Both Compartment and Bulk picking is batch picking, so they are available to pick under that Mode.
How To Pick
This section contains a few videos and simple step-by-step process on how to pick orders. There are several nuances and variations to that can be enabled on the app to meet exact needs in different warehouse operations - those will be addressed in different parts of the article, or in the Picking Group Settings article.
For the purpose of the basic process videos below, all Verification Scan Settings are turned ON.
Single Pick
- Open the Picking app
- Select Single Pick Mode
- Pick Ticket is selected or assigned automatically
- Scan Cart
- Begin Picking the first line
- Scan the Location
- Scan the Item
- Verify the Quantity - by scanning each item to add 1 or tap on the quantity box to select a qty to enter and Complete Pick
- The next item in the Pick list will automatically show next. Follow steps 6-8 on each successive item until all items are picked
- When the ticket is complete select an option to move to another picking task, go back to a selection screen, or review the pick ticket just completed
Batch Pick - Compartments
- Open the Picking app
- Select the Batch Pick Mode
- Scan a Cart to pull up a batch with a matching Cart Type
- Begin Picking the first line
- Scan the Location
- Scan the Item
- Scan one of the compartments selected
- Scan the Item into the compartment to verify the quantity. Scan as many are needed for the ticket
- Scan the next compartment and item to verify quantity. Go until all compartments are scanned and the screen moves to the next pick
- Pick the next item on the Pick List, following steps 5-9 until all items are picked
- When the batch is complete select an option to move to another picking task, go back to a selection screen, or review the batch just completed
Batch Pick - Bulk
The Bulk Pick method behaves the same was as a Single Pick in the app, the only difference being that multiple tickets are picked at a time in a batch. Refer to the steps outlined under that pick method for the scanning process. The video below depicts a Pack One batch being picked.
Pick Modes
When the Picking app is opened, there are 3 modes that can be selected to operate within: Single Pick, Batch Pick, or Both. Picking modes can help narrow the picking methods currently in use, so users know what to expect from automatic assignments and available list selections.
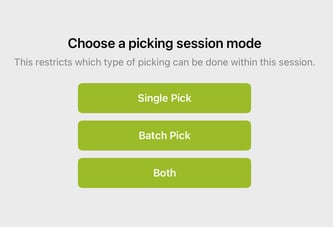
- Single Pick - only pick tickets that are assigned to a Single Pick method Pick Process will be assigned or display in the Picking List
- Batch Pick - only batches will be assigned or display in the Picking List to select from. This mode includes both Compartment and Bulk pick methods
- Both - single pick tickets and batches can be assigned, selected, or processed in this mode
Picking Group Settings
Picking can be configured to match operational preferences using the User Group settings. Groups are assigned to a User, multiple Groups can exist in the warehouse to allow for different permissions per user. A lead or more experienced user may have different permissions from a temp or new employee.
Picking settings include options like requiring carts or cart types, enabling different verification scans during the pick process, allowing short picks, picks before puts, etc. Please review the separate article on Picking User Group settings to see the options in detail.
Location Override
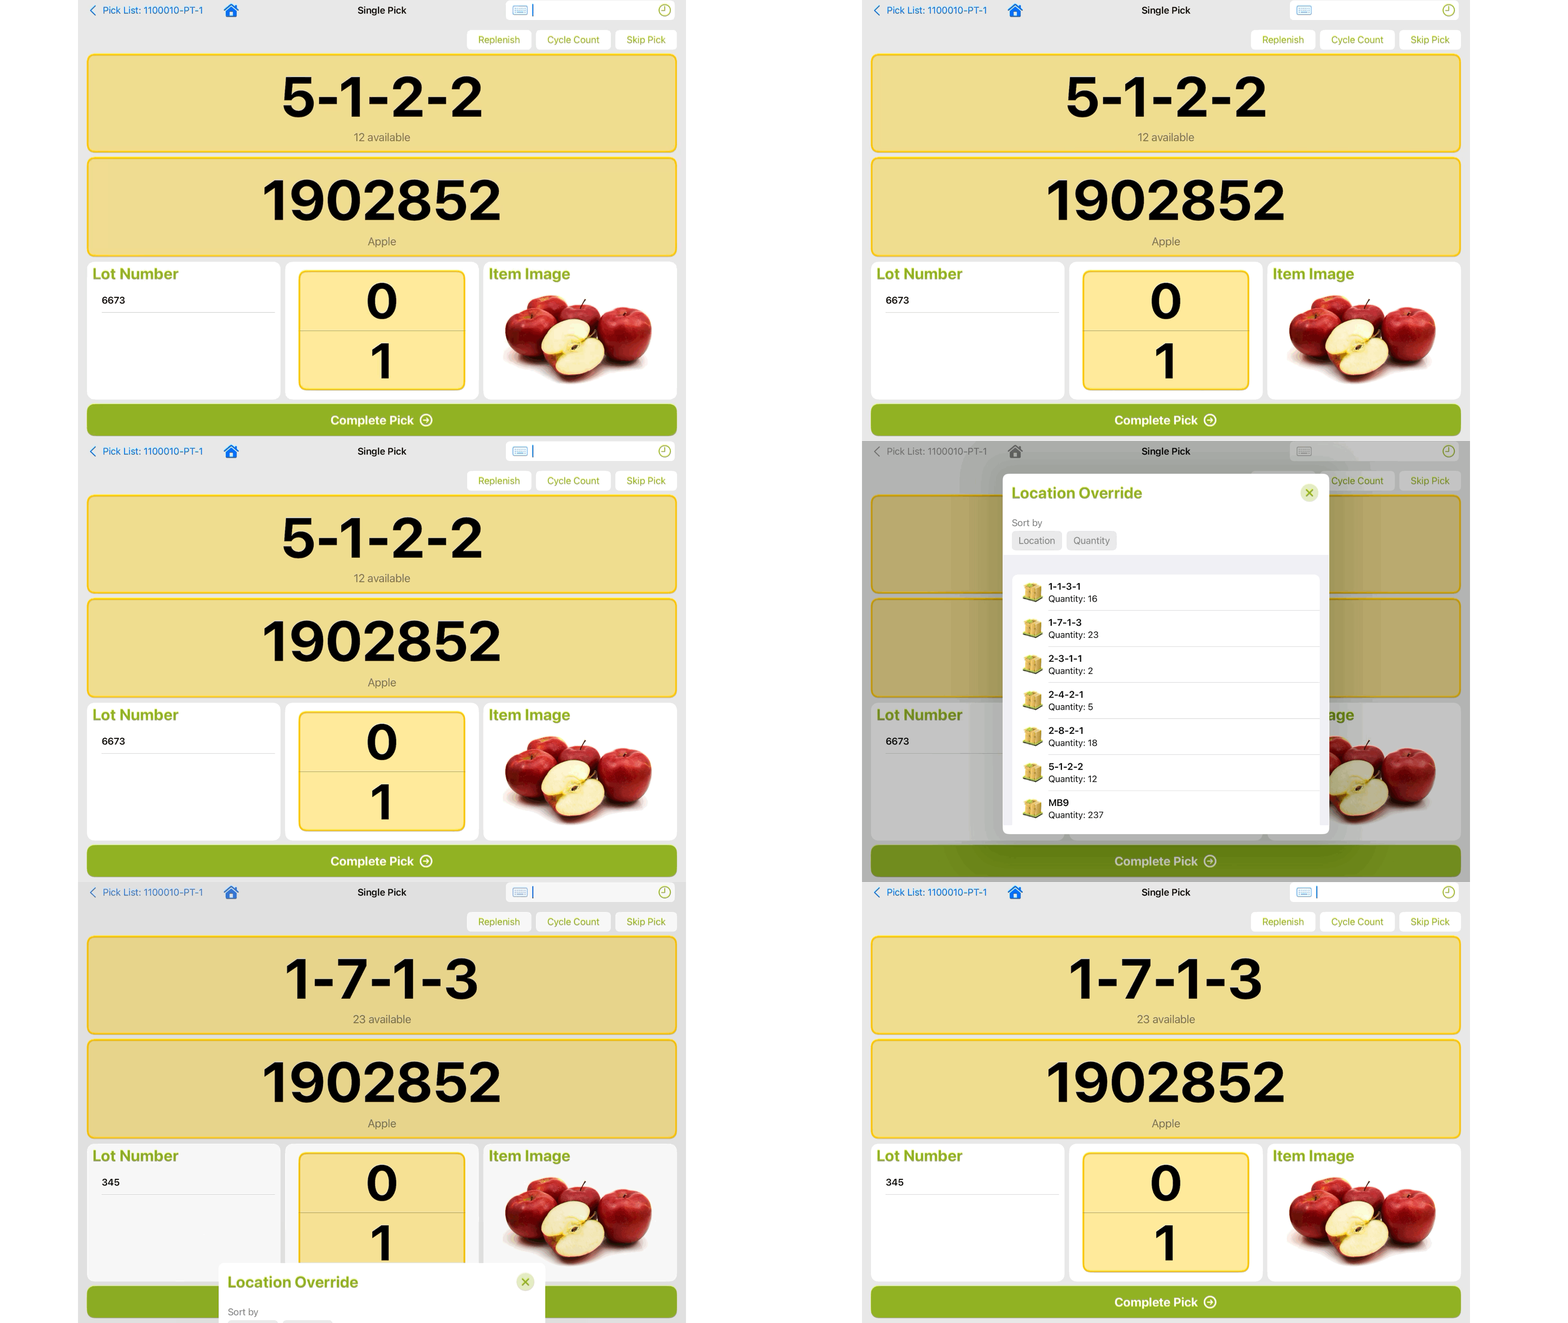
When a Pick cannot be completed from the allocated location, a Location Override can be performed to select a different location to pick the ordered quantity from.
This is a User Group setting that must be enabled to use.
To override the location, tap on the pick location on the screen. A popup will appear with a list of other locations to select from (see User Group Settings for what locations are eligible to appear on this list). Select a location from the list to update it and complete the pick.
Partial Pick Options
During the Pick Process, the required quantity may not be able to be fully completed from the originally allocated location. To help users continue processing in the picking app there are a few options: Short Pick, Split Pick, Skip Pick.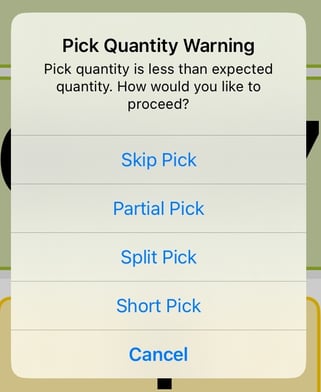
Short Pick
If the required quantity needed to pick to fill a ticket or batch is unavailable in the warehouse, full or partial quantities can be short picked. A short pick is an indication of needing to complete a ticket, and sometimes an order; without being able to ship the missing quantity on the current shipment. When a short pick is performed during picking a few things happen:
- The pick line in the app is completed for any quantity that was picked
- The pick ticket(s) and pick line affected by the short pick have the short quantity removed from the ticket
- A site setting can be enabled to automatically create a backorder pick ticket with any short picks lines added
- A history log record is created for "Short Pick Performed" to log the item and quantity that was shorted during picking
How to Short Pick:
-
Single/Bulk Pick
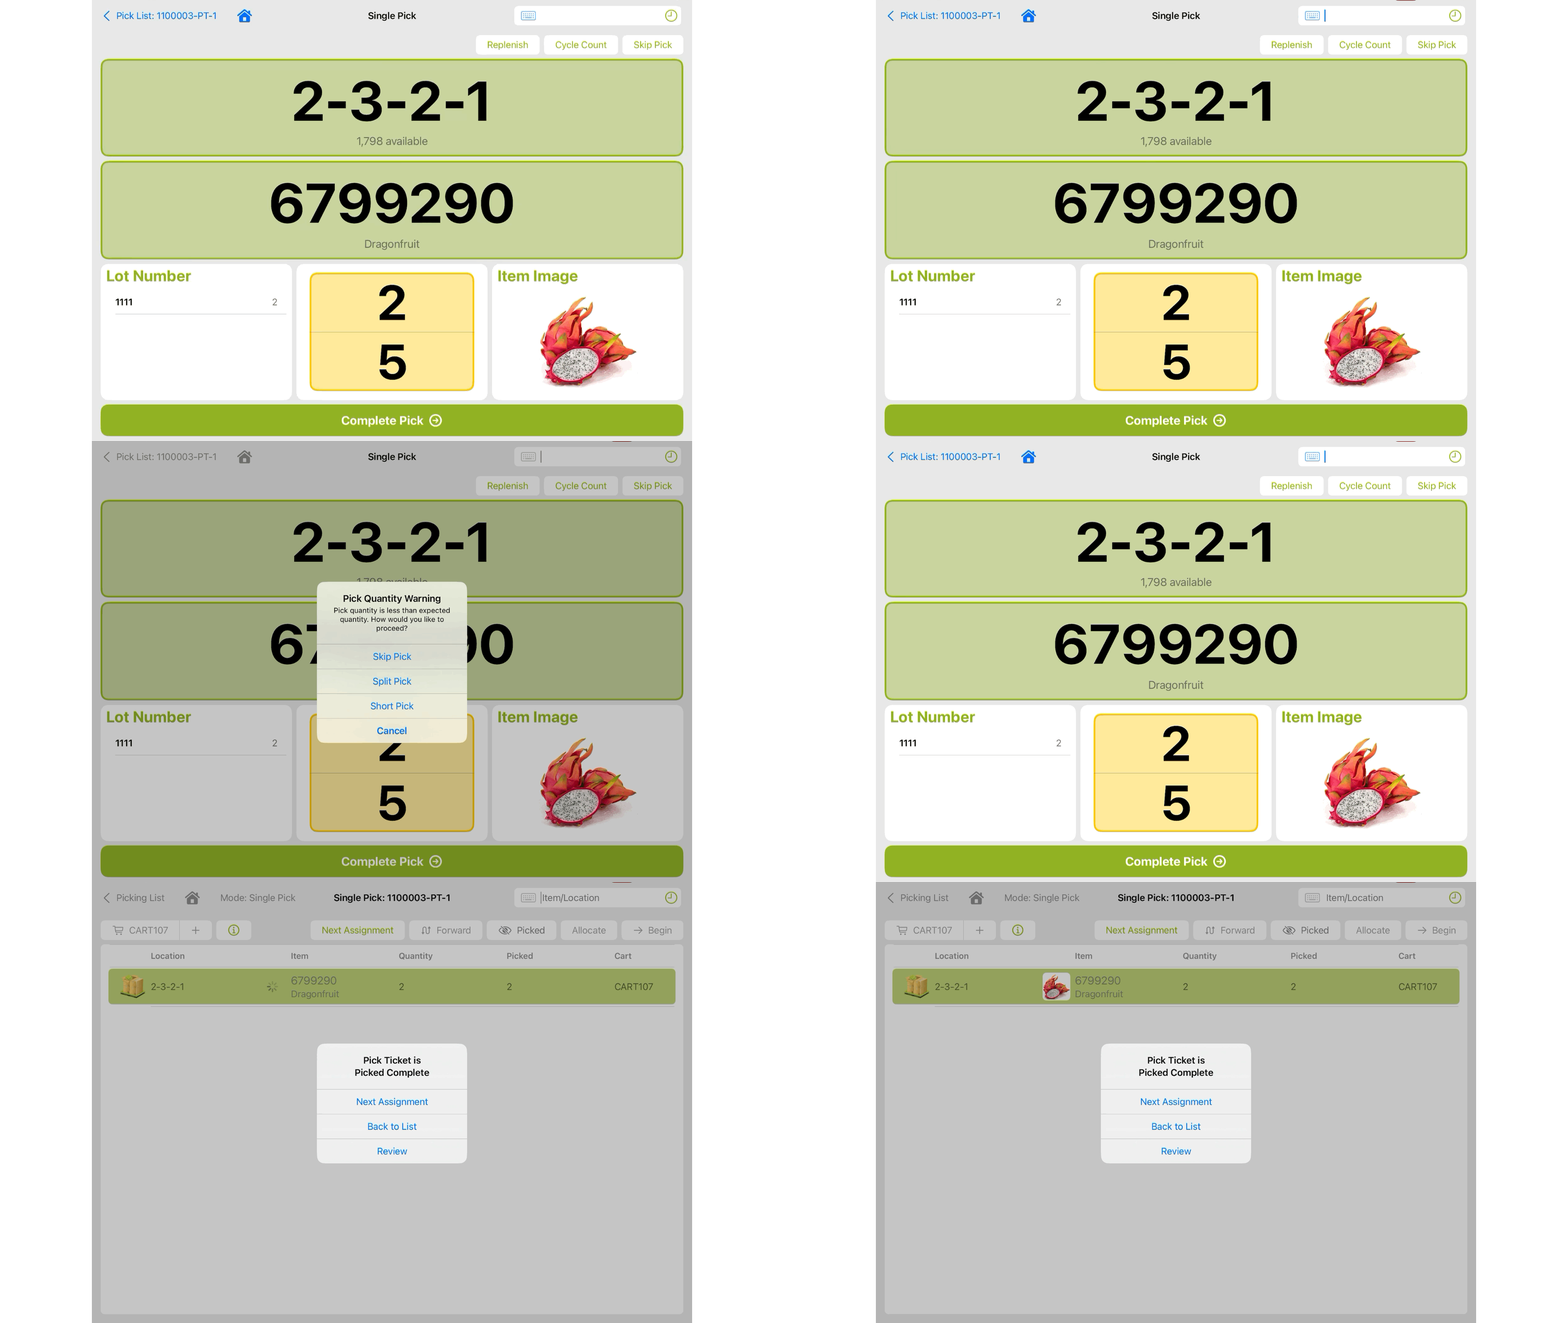
- On the pick screen, scan or enter the quantity that CAN be picked, (if 0, don't add any quantity)
- Select Complete Pick
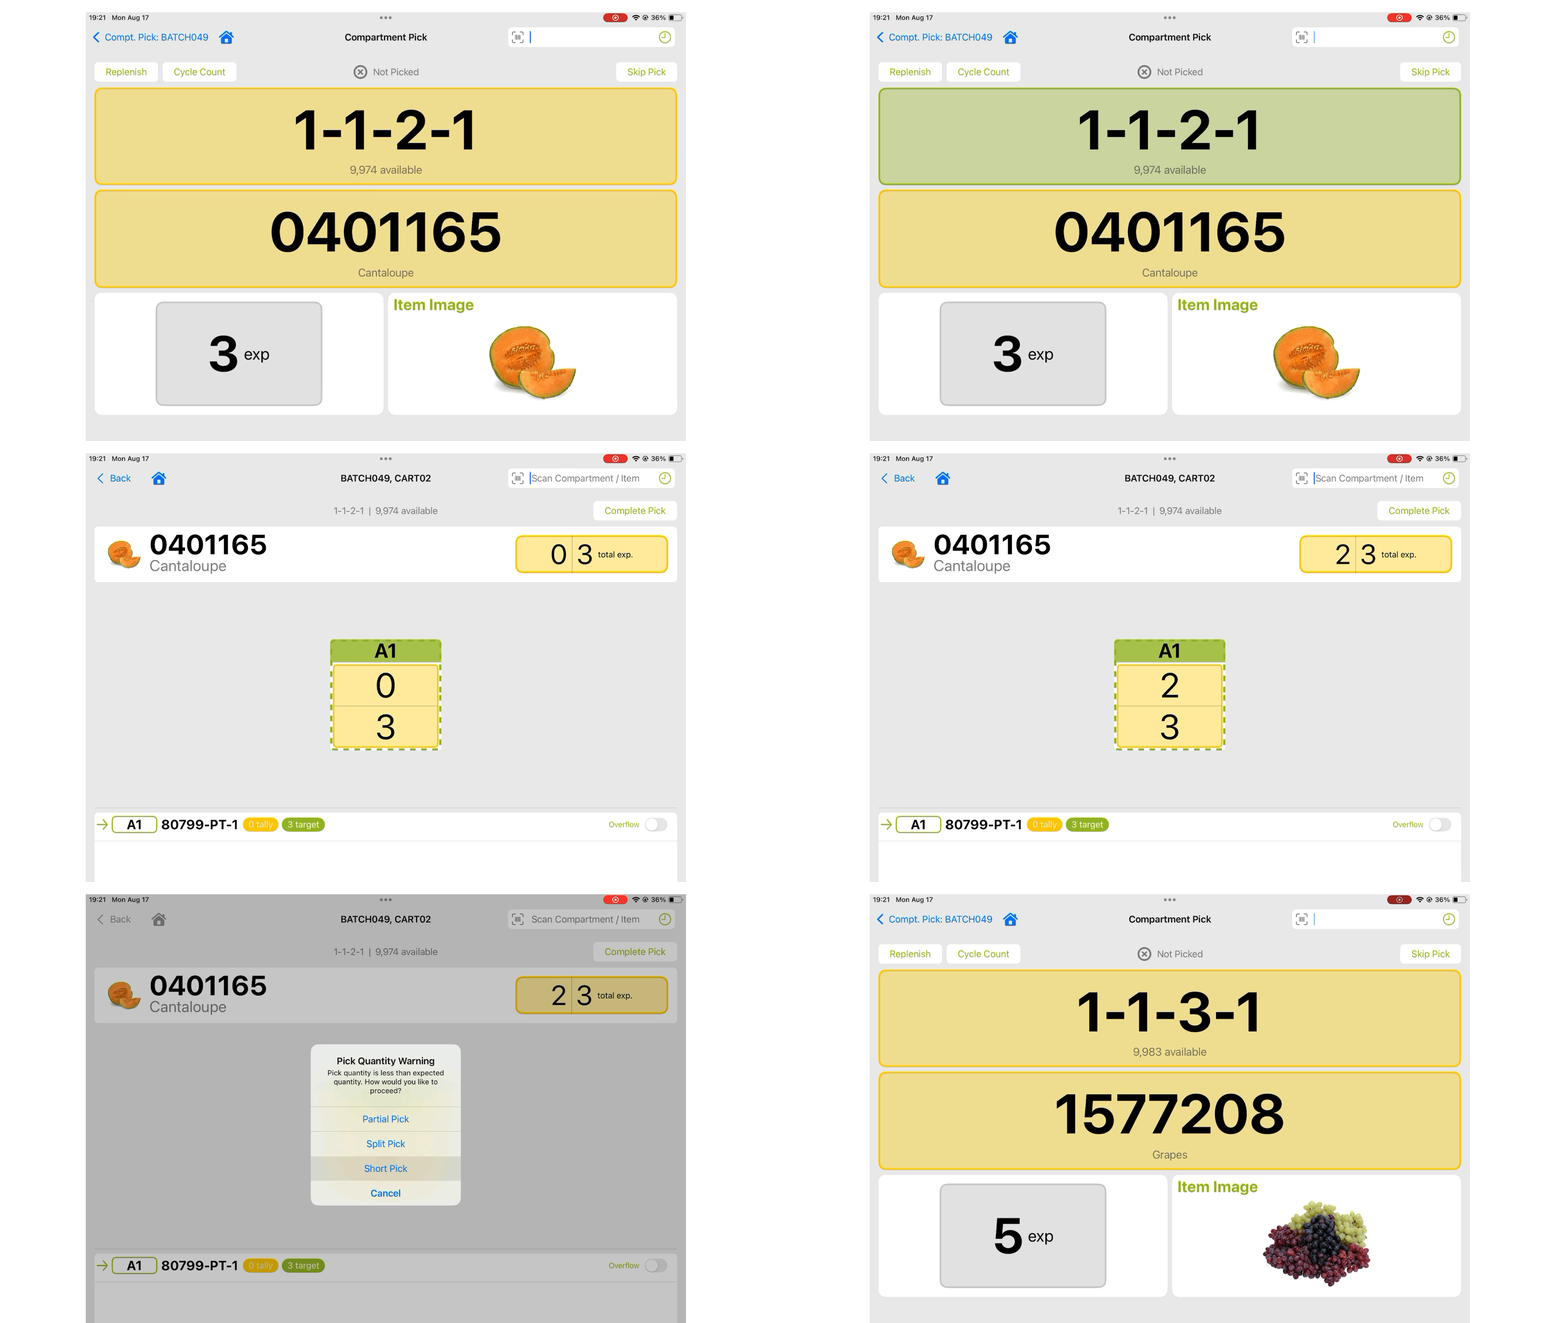
- Select Short Pick from the list of partial options that appears
-
Compartment Pick
- On the pick screen scan the location and item
- On the Compartment screen scan a compartment and quantity for any items that were picked (if no quantity was picked, scan nothing)
- Once the picked quantities have been scanned, select the Complete button on the top right to move forward
- From the list of options that pops up, select Short Pick
Split Pick
A Split Pick during picking is the option to pick part of the expected quantity from a location, then choose a different location to pick the remaining quantity from. A split pick will break the pick line into 2 lines - one at the original location and one at a newly selected location. The expected quantity is still fully picked, but from multiple locations.
This is typically used in scenarios of inventory discrepancies or stale allocation when the allocated location no longer holds the needed quantity.
How to Split Pick:
- Single/Bulk Pick
- On the pick screen, scan or enter the quantity that CAN be picked, (if 0, then use Location Override)
- Select Complete Pick
- Select Split Pick from the list of partial options that appears
- Select a different location to pick the remaining quantity from
- The current pick line has the quantity adjusted and is marked completed; a new pick line is inserted with the remaining quantity and selected location
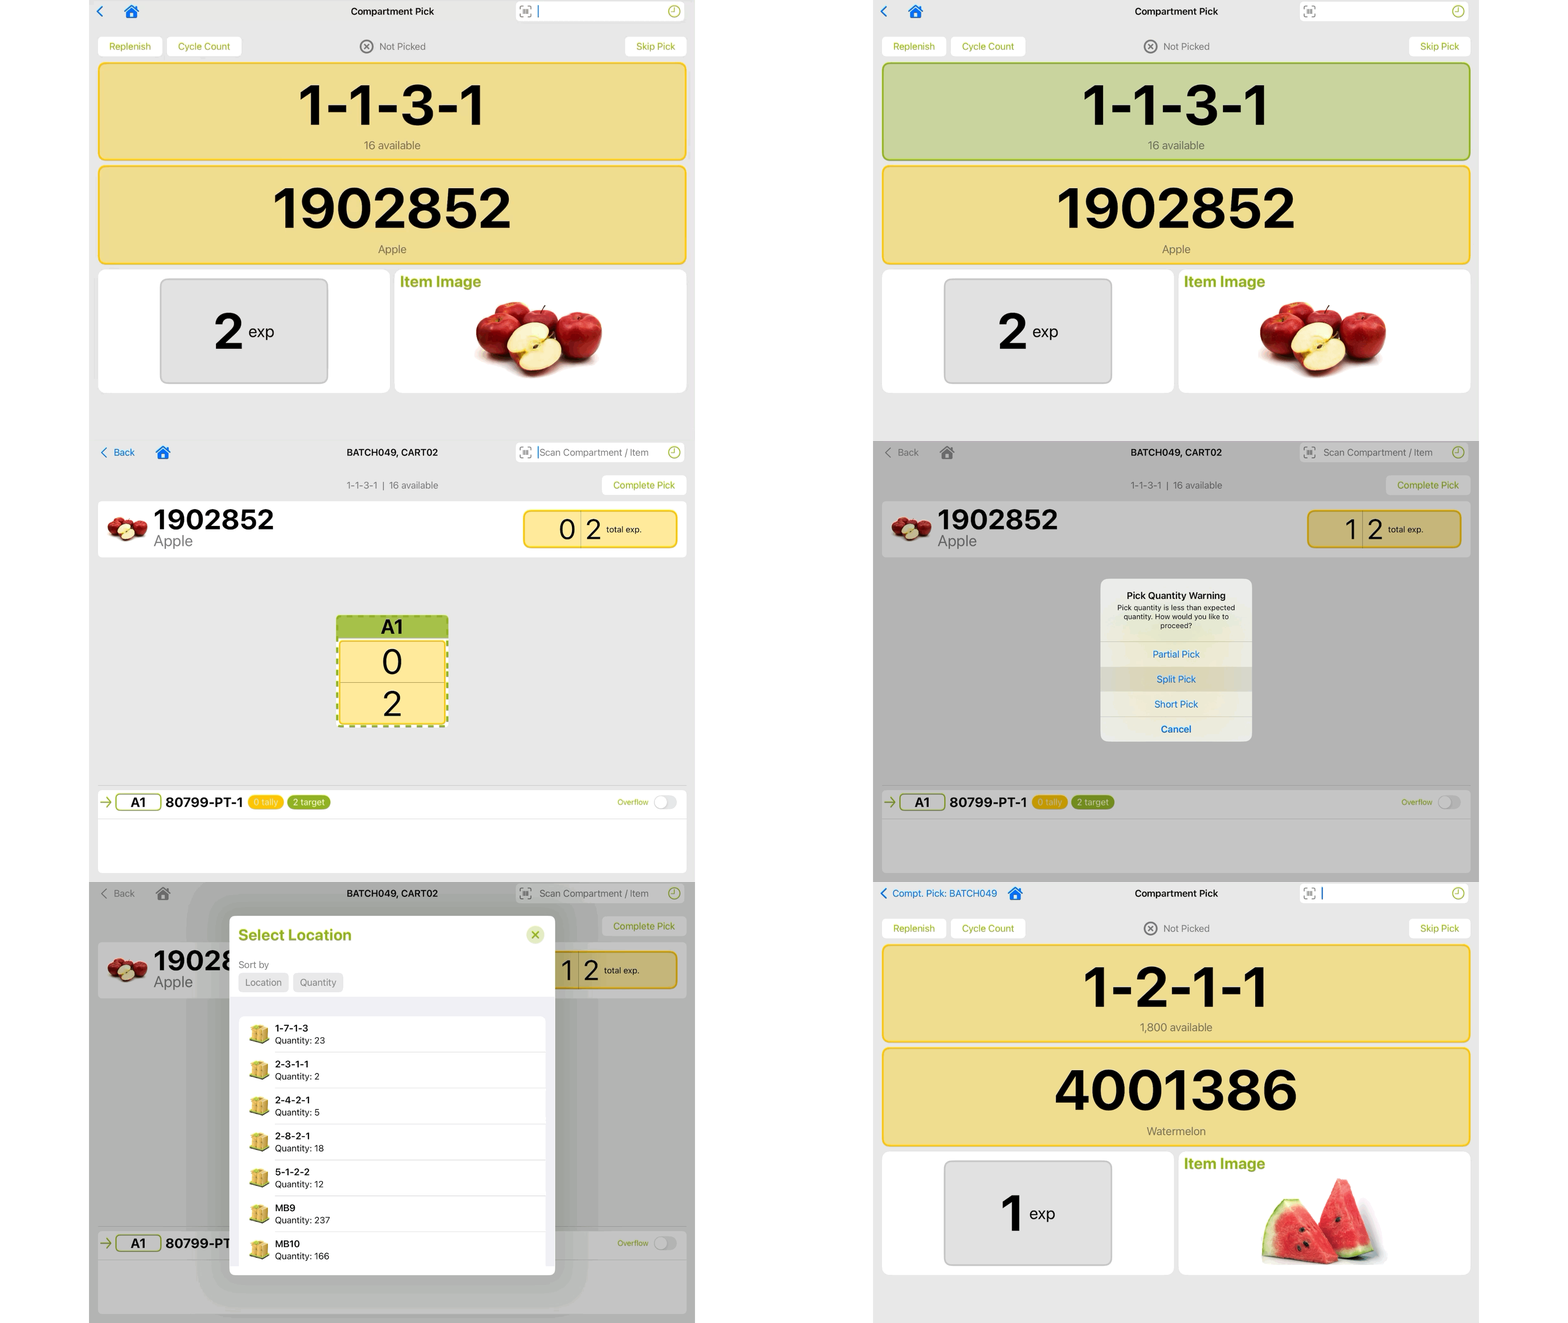
- Compartment Pick
- On the pick screen scan the location and item
- On the Compartment screen scan a compartment and quantity for any items that were picked (if no quantity was picked, use Location Override)
- Once the picked quantities have been scanned, select the Complete button on the top right to move forward
- From the list of options that pops up, select Split Pick
- Select a location to pick the remaining quantity from
Partial Pick
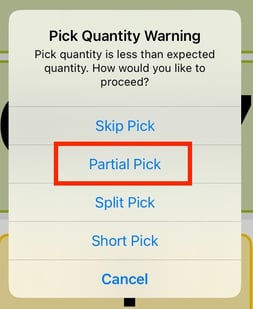
A Partial Pick can also be performed during picking to pick a partial quantity from a location, then return back to the same location and pick the remaining quantity.
Skip Pick
Skipping a pick is straightforward, simply skips the current item showing to be picked and moves on to the next item on the pick list. No actions are performed against the skipped item, inventory or otherwise. The pick remains open and can be resumed and completed at any time.
The pick line will be highlighted as purple when skipped for easy finding when seeking to resume picking the item.
To skip a pick during Single or Bulk Picking - tap on Complete Pick and select Skip Pick 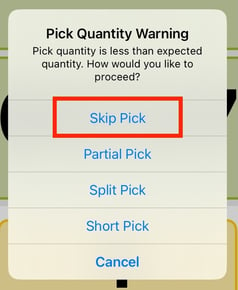
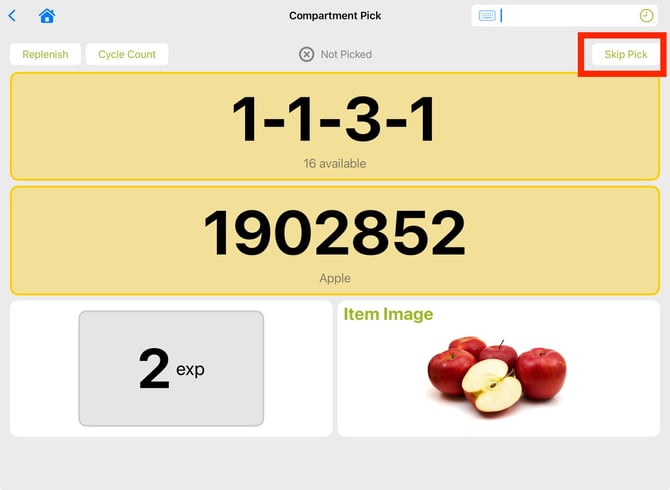
To skip a pick during Compartment Picking - use the Skip Pick button on the top right on the pick screen.
Picking Lots
Lot numbers are stored on inventory records for items that have "Lot Required" turned on. When picking an item using lots, the picking app will automatically assume the lot number if there is only a single lot in the location. If multiple lots are stored in the location being picked from, the user must scan or select a lot to be applied.
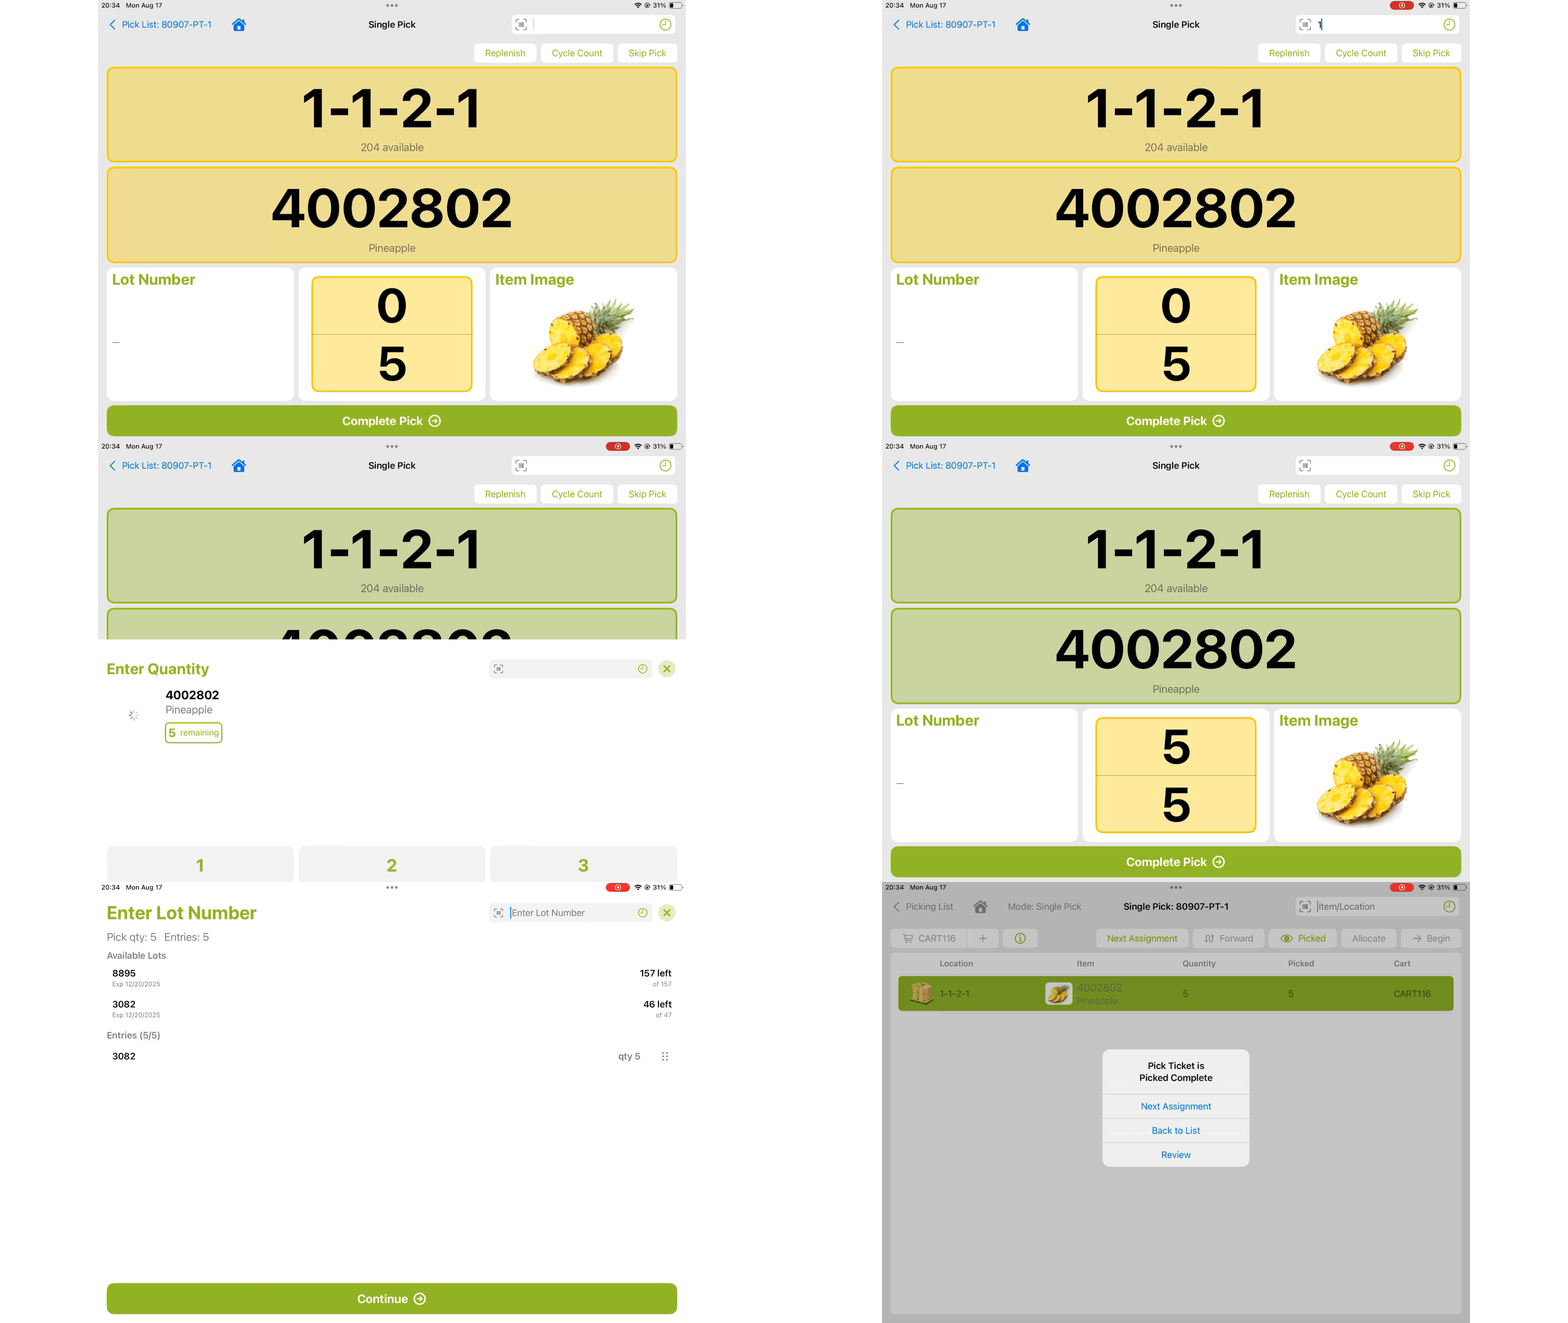
If the Require Quantity Verify setting is turned on for the User Group and items are scanned one at a time, each item scan will require a lot scan or selection. See image below. This is the same for Compartment picking.
If Allow Lot Selection is turned on for the User Group then the list of stored lot numbers in that location will appear to be selected from. If disabled, a lot number must be entered with a scan or manual typing.
Picks Before Puts
The Picks Before Puts setup is a User Group Setting that can be enabled to allow for multiple items to be picked from the shelf and then organized into the compartments on the cart. This is strictly applicable to Compartment Picking, not Single or Bulk pick as those are automatically assigned to the cart on one screen.
Use cases from this can vary, a few examples might be:
- Picked items are small and picking aprons or small rolling carts are used to store multiple items being picked at a time before organizing into the compartments on the cart
- Aisles are too narrow to pull a cart down, so user leaves the cart in a main channel and has to walk down the aisle to grab the item off the shelf before bringing it back to the cart. Picks before Puts will allow for multiple items to be grabbed off the shelf down the aisle before coming back to the cart
- Cherry pickers or lifts are used to pick product on higher shelves that the carts can't be brought up to. Users on the lift are able to pick multiple products from those high locations without having to come back down to the cart between each pick
The Picks Before Puts flow breaks the Picking process into 2 steps: the Pick and the Put:
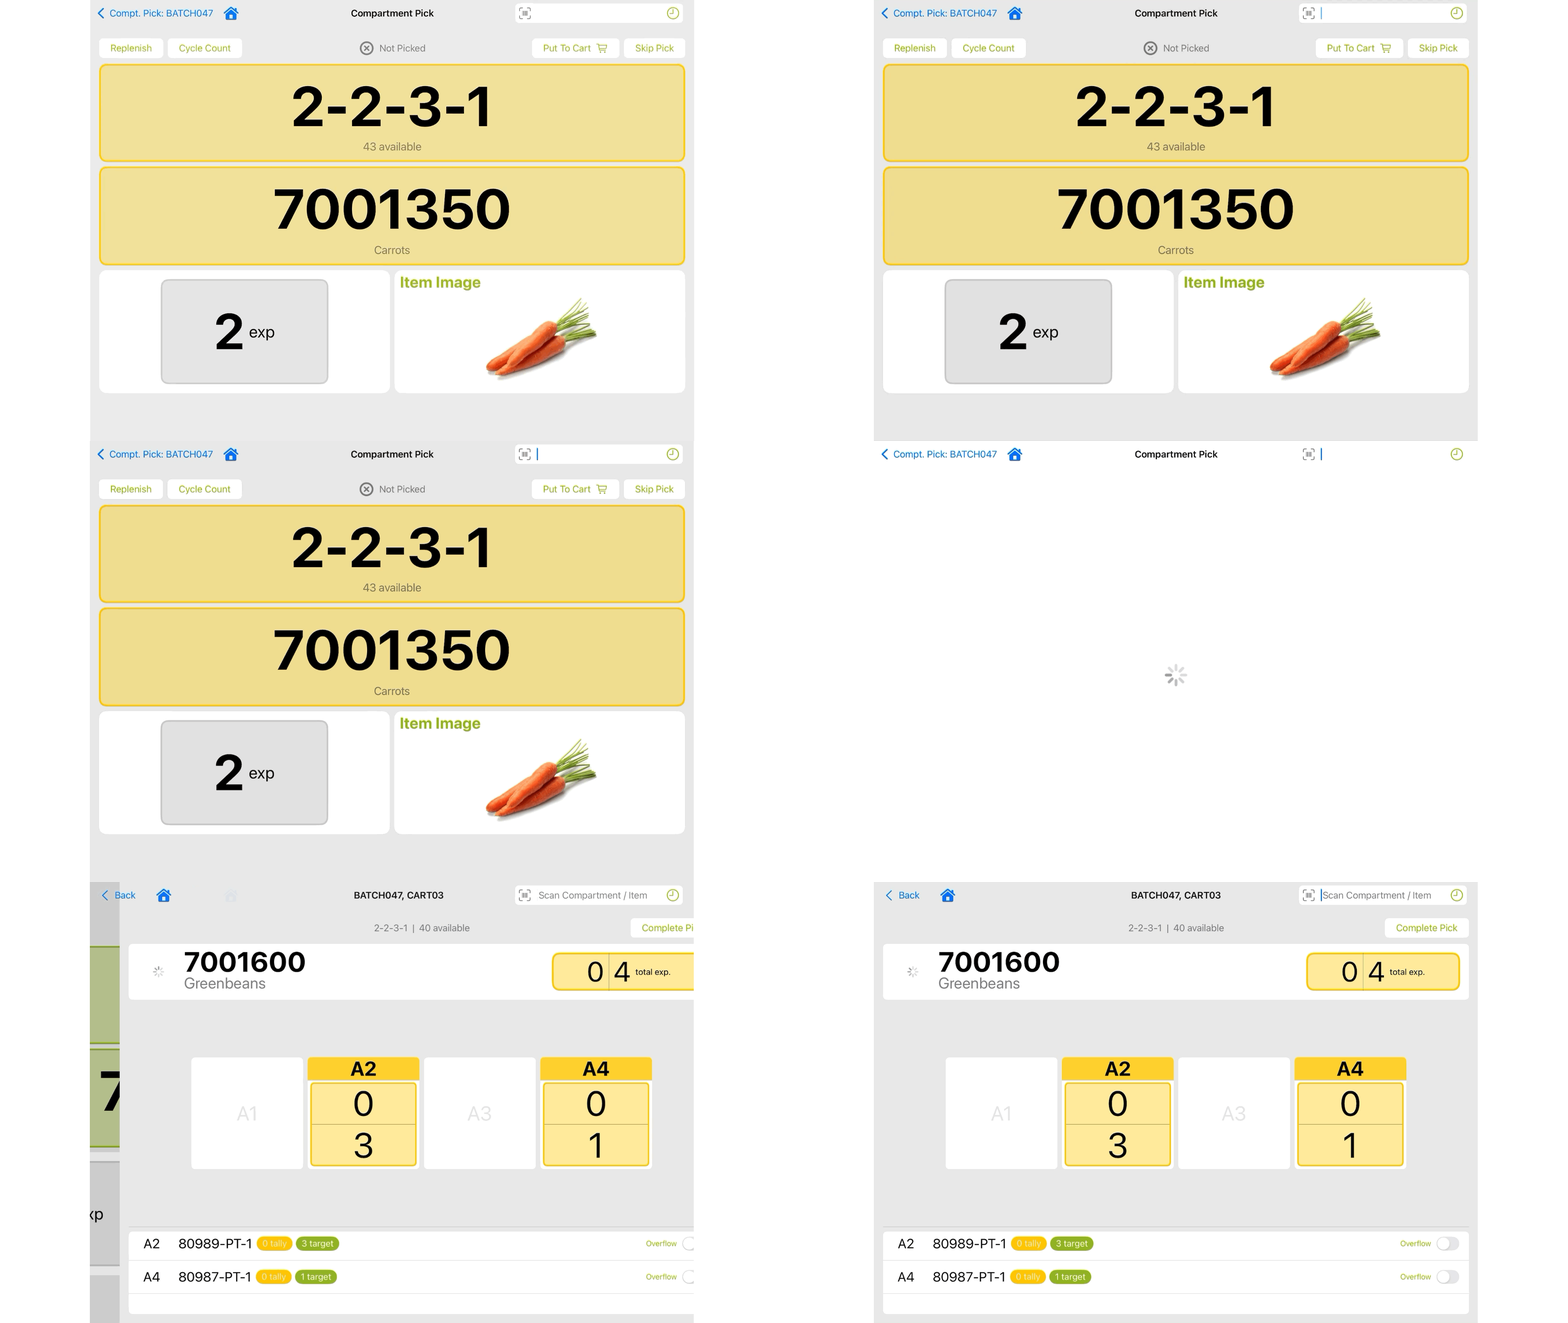
- The Pick Step: when picking is started from the Pick List, it will open the Pick screen with the location, item, and quantity. After any Location or Item verification scans, it will automatically move on to the next item's Pick screen, and the next, and so on.
- At any point, a user may either tap the “Put to Cart” button on the Pick screen or go back to the Pick List to move to the second step and organize items in the cart compartments. If the "Put to Cart" button is used, it will pull up the last picked item's compartment screen
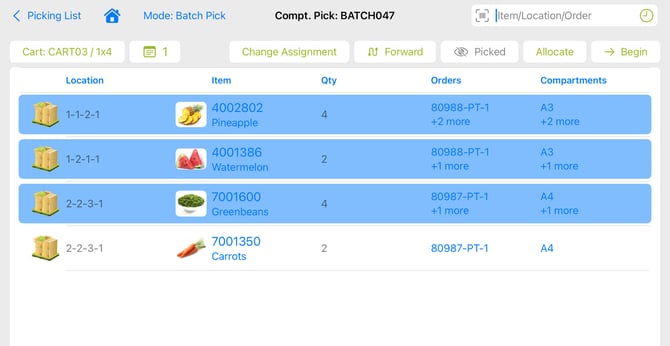
- Any pick lines that have been picked but not yet put on the cart show highlighted blue on the Pick List
- At any point, a user may either tap the “Put to Cart” button on the Pick screen or go back to the Pick List to move to the second step and organize items in the cart compartments. If the "Put to Cart" button is used, it will pull up the last picked item's compartment screen
- The Put Step: organize the picked items into the cart compartments by scanning the item to pull up the correlating Compartment screen. The Put step can be initiated by using the "Put to Cart" button on the Pick screen, described above, or by backing out to the Pick List.
- Put to cart - if this button is selected then it will open the Compartment screen for the item that was last picked. It can be organized into the compartment and verified, or another item may be scanned instead to pull up that Compartment screen
- Pick List - from the Pick List a user can scan any picked item to open the correlated Compartment screen. Any required verification scans for the compartment and quantity can be performed while the items are organized on the cart. After verification is complete the next item's Compartment screen will open - the next Compartment screen may not match the physical item that on top of the picked pile, scan the item to pull up the correct Compartment screen and perform that verification process.
Continue until all picked items are on the cart. Once that happens, the next pick on the list will automatically display.
- Put to cart - if this button is selected then it will open the Compartment screen for the item that was last picked. It can be organized into the compartment and verified, or another item may be scanned instead to pull up that Compartment screen