
Table of Contents
Overview
This article's purpose is to assist with showing how to create locations for WOS in bulk and importing them successfully. The process of creating locations in a spreadsheet can be arduous depending on the quantity and complexity of the locations, but there are a few basic tricks and tips for managing the spreadsheet to make this process easier.
As always, the WOS Support team is happy to assist with creating new warehouse locations if preferred. Please reach out to support@warehouseos.com with your request, and a proposal and timeline can be coordinated.
Create Locations in Excel
There are multiple ways to approach creating several locations in a spreadsheet, and several ways to manipulate data in a streamlined manner. This article is directed to users who have little or basic knowledge and understanding of Excel or Google Sheets, making this process feel more accessible.
Creating Locations from Scratch
When creating locations from scratch knowing the number of rows, bays in each row, and slots on the bay is important. Having a map or outline is helpful to reference visually for the pick path and row numbering.
Plan to create the locations in order of the pick path. In this article we are assuming the location numbering and pick path start at the same place.
This is not always the case, if Row 1 is not the start of the pick path, start the spreadsheet with whatever Row will start the pick path.
- Navigate to Admin -> Import/Export Records -> Locations -> Export (Headers Only)
- If required data fields are already known, delete any column headers that will not be used. It is always recommendable to keep the spreadsheet clean and concise. Fields typically unused and removed by our team:
- Group
- Location Size
- Aisle
- Custom Fields
- Enter the Row, Bay, Tier, Slot number at the top with the first numbers that will represent the location name.
e.g. location name 1-1-1-1, Row: 1; Bay: 1; Tier: 1; Slot: 1
- Location names can have alphanumeric characters (1-1-A-1), but the Row, Bay, Tier, Slot fields can only contain numbers. A CHAR function can be used later to convert the number into a character (see step 9)
- Build the first bay in the row using those fields. Example image is Bay 1 with 4 shelves (tiers) and 3 slots (bin positions).
TIP: it's usually more efficient to pick by slot position. For the pick path consider picking slot 1 in all tiers, then moving on to slot 2, etc. (this is in the example below)
- Once the first bay has been created, copy and paste below itself. Change the Bay value to 2 in the copied section to create the next bay.
TIP: to change the value to 2, update the first cell then double click on the bottom right of the cell to copy down the remaining cells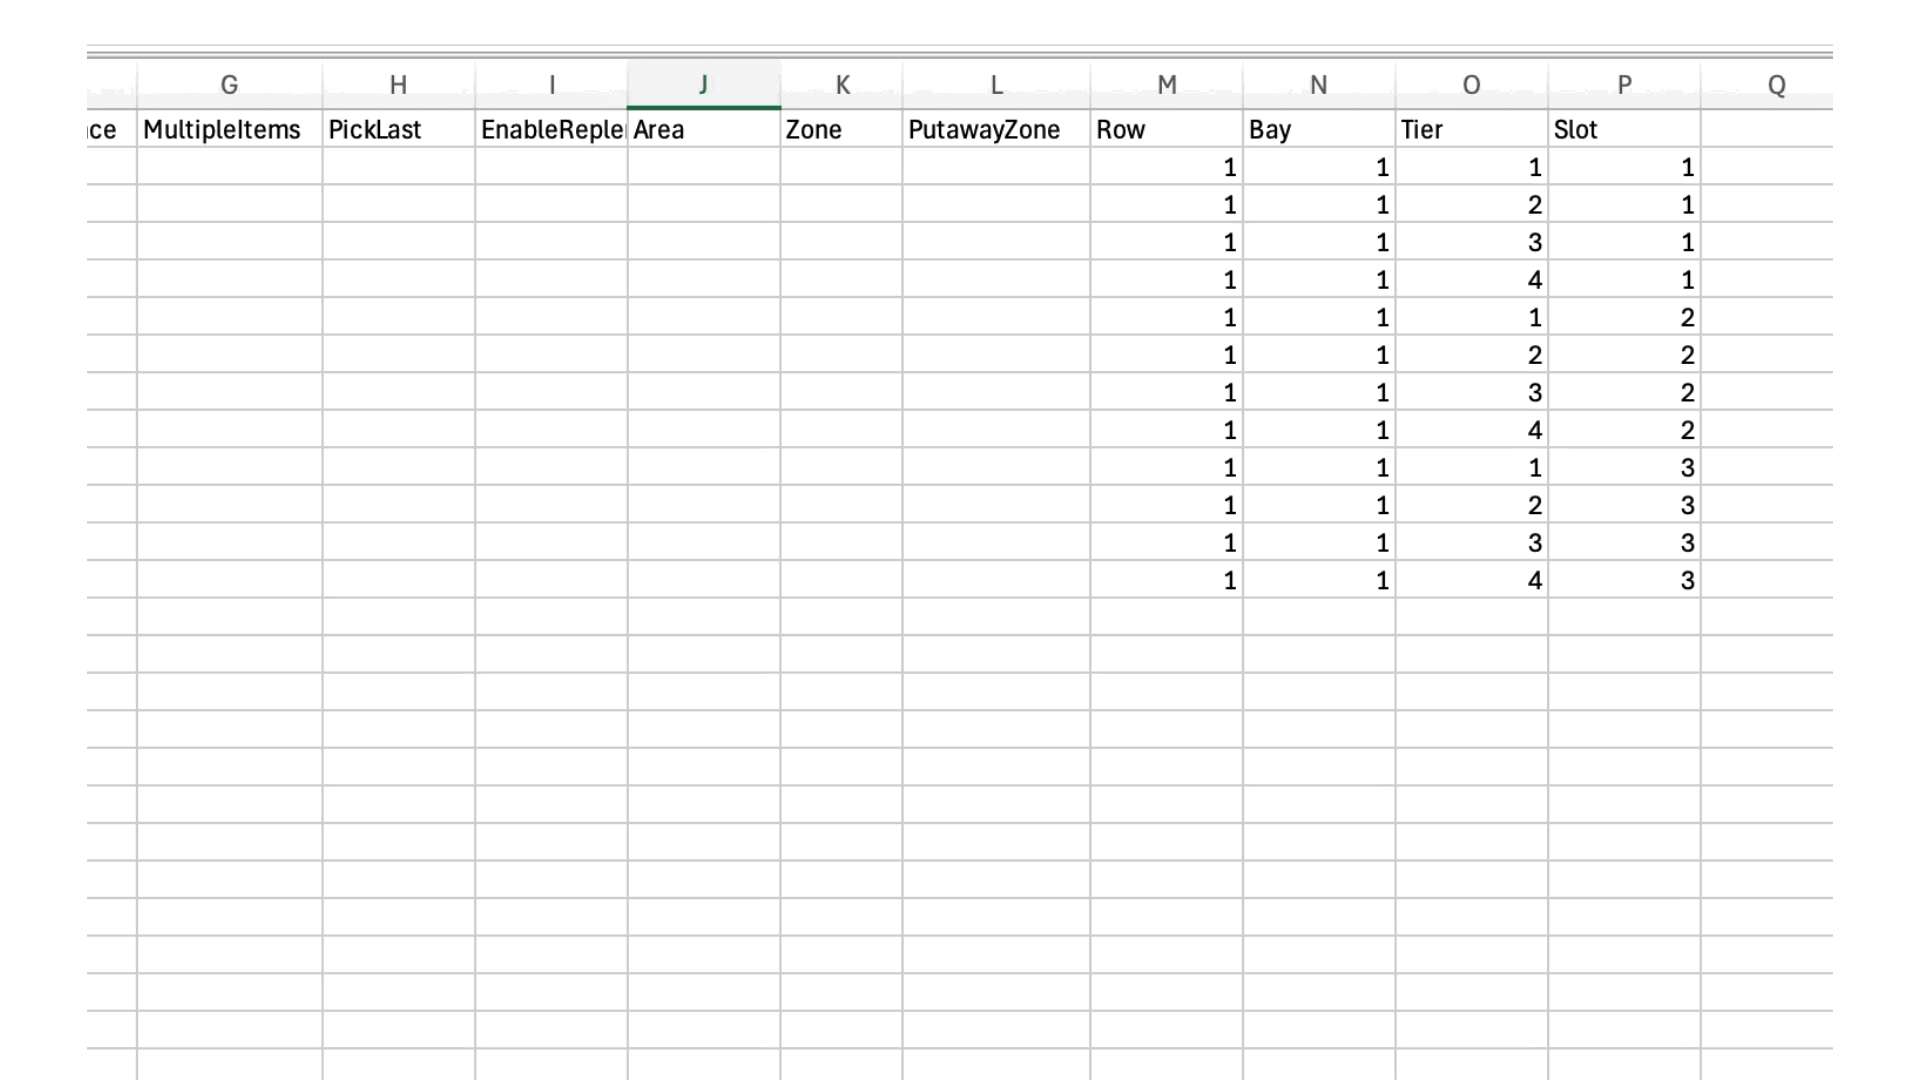
- Repeat the process by pasting the cells making up the first bay again and updating the bay value to each bay number, until all bays in Row 1 are done.
- If Row 2 will be the same as Row 1 in configuration (same tiers and slots), copy ALL of the cells making up Row 1. Paste below and change the Row value to 2, creating Row 2.
- Repeat for as many Rows will be the same.
- If the number of bays is the only thing that will vary among Rows, follow this same copy and paste process and edit the bays as needed (delete any extra bays, or add a few to the end)
- Repeat for as many Rows will be the same.
- If any Rows are formatted significantly different, start back at step 4 to build the bay in the new format below the previously created locations. Follow the steps until all Rows in this format have been configured.
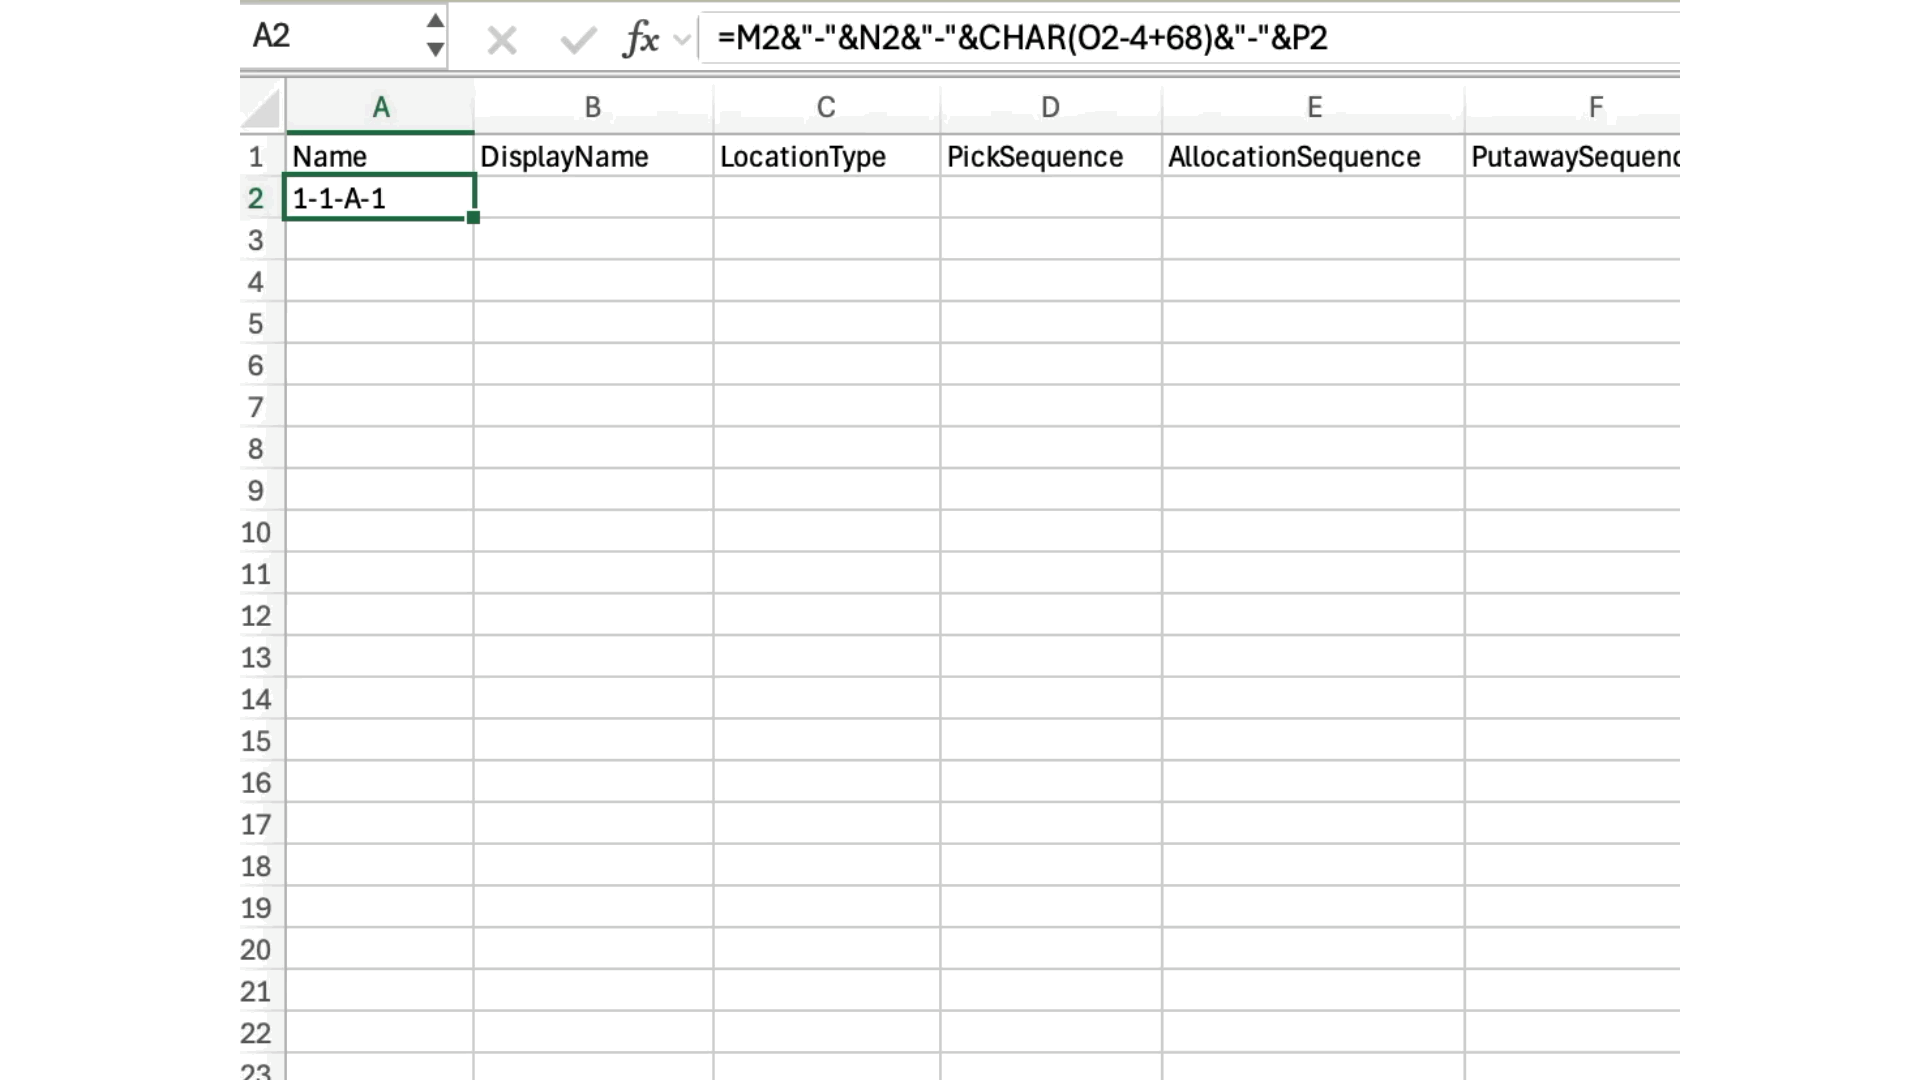
Repeat this process until all locations have been configured. - Scroll back to the top of the spreadsheet to the first locations. In the Name field write a function that will create the location name based on the Row, Bay, Tier, Slot values.

- example function: =M2&"-"&N2&"-"&O2&"-"&P2
location name 1-1-1-1 - example function: =M2&"-"&N2&"-"&CHAR(O2-4+68)&"-"&P2
location name 1-1-A-1 - example function: =TEXT(M2,"00")&"-"&TEXT(N2,"00")&"-"&CHAR(O2-4+68)&P2
location name 01-01-A1
(this will ensure 2 digits show on the first 2 numbers, so "02", "12", "32" etc.)
- example function: =M2&"-"&N2&"-"&O2&"-"&P2
- Once the location name is configured to preference, copy the formula down to create names for all other locations.
- Set the DisplayName to equal the value in the Name cell next to it.
- Determine the Location Type. Options are "Pick", "BackStock", "Reserve", "Hold", or "Replenish"
- If certain shelves are Backstock locations, consider writing a formula to assist with populating this. For example if tier 4 and above make up the overstock locations: =IF(O2<4,"Pick","BackStock")
O2 being the cell representing the tier
- If certain shelves are Backstock locations, consider writing a formula to assist with populating this. For example if tier 4 and above make up the overstock locations: =IF(O2<4,"Pick","BackStock")
- Add the Pick Sequence numbers by starting low and incrementing each locations pick sequence higher.
It is recommended to leave some gaps in between locations to account for additional locations created later, or future edits, but not required. The Pick Sequence can be 1, 2, 3, 4, etc.- If incrementing by a set value, for example 5, use another function to set the Pick Sequence value. Set the top cell as 5. In the cell below add the function: =D2+5 and copy down.
- Add Allocation Sequence. A default is to set the Allocation Sequence for BackStock or Reserve locations higher than the Pick locations. Use the Location Type value to create another function: =IF(C2="Pick",10,150).
- All other fields are dependent on configuration preferences.
- Putaway Sequence usually follows the Pick Path and mirrors the Pick Sequence, unless needing to be different for doing Putaways
- Multiple Items set to TRUE or FALSE
- Pick Last set to TRUE or FALSE
- Enable Replenish set to TRUE or FALSE
- Area can be set if using areas, attribute locations to different Area values
- Zones can be set if using zones. A default for setting up zones is for replenishment, creating different zones based on Location Type
- Putaway Zone used to breakup Putaways into smaller groups, could be organized per Row or grouping a few together
- Once the spreadsheet is filled out with all locations and their configuration, save the sheet as a CSV file to prep for import.
Considerations: The only required field for location imports are Location Name. All other fields are informational and completely configurable.
The Location Type field is case sensitive and will need to match the exact value of the location type list in WOS (also displayed accurately above in step 12).
If the pick path will route down one row and back up the second, resulting in the bays being picked in an ascending then descending order, create Row 1 and Row 2 separately. Row 1 with bays in ascending order; Row 2 with bays in descending order. Then copy them together and paste below creating 2 rows at a time, updating the corresponding values to be Row 3 and 4, 5 and 6, etc.
The video below shows a fast example of creating a spreadsheet of locations using the steps and tips listed above.
Adding Locations to Warehouse
When adding new locations to a warehouse that already has locations in WOS, it can be important to match up certain details to the existing data. The most important piece of this will be inserting the new locations into the pick path in the correct order and making any needed adjustments.
The steps listed in the above section to create locations from scratch can be used to create the new locations that will be added, up to step 12. Use this spreadsheet with the newly created locations to insert them to the existing locations by following the steps below.
- Navigate to Admin -> Import/Export Records -> Locations -> Export
- Open the file to view existing locations
- Delete the UNKNOWN location
- Use the Filter and Sort option to sort by Pick Sequence, this will put the locations in order of the current pick path - which is important for inserting new locations accurately into the path
- Find the place along the pick path that the new locations need to be added. Copy the new locations from the spreadsheet where they were created and right click on the existing location list to use the Insert Copied Cells function.
- Adjust the Pick Sequence for the new locations to fall in line with the surrounding locations Pick Sequence, effectively inserting them into the pick path.
- Adjust any other fields or values that need to be set or matched.
The recording below demonstrates the Insert function and adjusting the pick sequence to match.

Import Locations via CSV
Once a spreadsheet of locations has been created, or updated, it can be imported to WOS using the Import/Export Records page.
Go to Admin -> Import/Export Records -> Locations -> Import.
To import a file it must be a CSV format. If locations are created in an Excel or Google Sheet, simply use the Save As option and select CSV.
When importing, an email address is required for any error messages if there are errors during the import. A phone number is optional, but if entered it will send a text once the import is either completed and ready to view, or if it encountered errors that need to be resolved.
When an import is successful, if any locations are found in WOS that have a match on the Location Name, any imported fields will be updated on the existing location. If a location does not already exist, it is created new.
If a Zone or Area that did not previously exist in WOS is included in an imported file it will be created with the import - with the exception of Putaway Zones. A Putaway Zone must be created in WOS first before importing in a file.
Common Importing Mistakes/Errors
- Sometimes empty columns can throw errors. If a column is empty with no data, delete it from the sheet
- Header names MUST match the required headers for the file type. To ensure accuracy, export the Headers or export the locations initially then make final edits in that sheet
- The UNKNOWN location cannot be imported. When locations are exported initially it is included in the sheet at the top, consider deleting the UNKNOWN location immediately to remove any issues later
- The Aisle, Row, Bay, Tier, and Slot fields can ONLY contain number values. It is okay to use an alphanumeric character in the location name, but it must be converted from a number in those fields
- If wanted to prefix the locations with an aisle or grouping indicator that is just a letter, it can be prefixed to the location name in the function, independent from these fields
- Location Types are case sensitive and MUST match the values in WOS exactly (most common issue is with importing a "BackStock" location type)
- If a field is a flag, like "Multiple Items" it is looking for a TRUE or FALSE value
- Location Size only allows specific values: "S1" and "S2"